

리빙드로우 개발 중 작가 등록 시 휴대전화 인증 서비스가 필요하였다. 본인인증까지는 필요하지 않았기 때문에, 단순 SMS 메시지를 통해 인증번호를 전송하는 정도면 충분하겠다 생각했다.
그래서 여러 SMS 대행업체를 찾다가, 네이버 클라우드 플랫폼에서 SENS(Simple & Easy Notification Service)를 서비스하는 것을 발견했다.
https://www.ncloud.com/product/applicationService/sensSMS 기준 월 50건 무료에 건당 9원인데, 무료 50건으로 충분히 테스트 가능하다 생각해서 서비스 이용을 결정했다.
사용법 : https://docs.ncloud.com/ko/sens/sens-1-3.html
API 가이드 : https://apidocs.ncloud.com/ko/ai-application-service/sens/sms_v2/
처음 API v1을 이용하고, 문서를 찾아보니 12월 경 서비스 종료 예정... 문서를 잘 봅시다.. 다시 API v2를 이용했다.
1
2
3
4
5
6
7
8
9
10
11
12
13
14
15
16
17
18
19
20
21
22
23
24
25
26
27
28
29
30
31
32
33
34
35
36
37
38
39
40
41
42
43
44
45
46
47
48
49
50
51
52
53
54
55
56
57
58
59
60
61
62
63
64
exports.smsVerification_post_ncpV2 = function (req, res, next) {
const phoneNumber = req.body.phoneNumber;
const NCP_accessKey = secretKey.NCP_API_access_key;
// access key id (from portal or sub account)
const NCP_secretKey = secretKey.NCP_API_secret_key;
// secret key (from portal or sub account)
const NCP_serviceID = secretKey.SENS_service_ID;
// sens serviceID
const myPhoneNumber = secretKey.myPhoneNumber;
const space = " "; // one space
const newLine = "\n"; // new line
const method = "POST"; // method
const url = `https://sens.apigw.ntruss.com/sms/v2/services/${NCP_serviceID}/messages`;
// url (include query string)
const url2 = `/sms/v2/services/${NCP_serviceID}/messages`;
const timestamp = Date.now().toString(); // current timestamp (epoch)
let message = [];
let hmac=crypto.createHmac('sha256',NCP_secretKey);
message.push(method);
message.push(space);
message.push(url2);
message.push(newLine);
message.push(timestamp);
message.push(newLine);
message.push(NCP_accessKey);
const signature = hmac.update(message.join('')).digest('base64');
const number = Math.floor(Math.random() * (999999 - 100000)) + 100000;
request({
method: method,
json: true,
uri: url,
headers: {
'Content-Type': 'application/json; charset=utf-8',
'x-ncp-iam-access-key' : NCP_accessKey,
'x-ncp-apigw-timestamp': timestamp,
'x-ncp-apigw-signature-v2': signature.toString()
},
body: {
"type":"SMS",
"contentType":"COMM",
"countryCode":"82",
"from": myPhoneNumber,
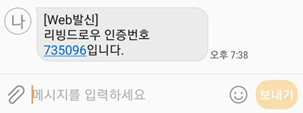
"content":`리빙드로우 인증번호 ${number}입니다.`,
"messages":[
{
"to":`${phoneNumber}`,
}
]
}
},function (err, res, html) {
if(err) console.log(err);
console.log(html);
});
};
가이드 따라서 만들면 무난했는데 signature 만드는 부분에서 HMAC의 개념을 잘 몰라 따로 찾아보았다. 그중 설명이 잘 되어있다고 생각하는 글
http://naver.me/Fs91Jsqp또 HMAC 부분 message에 url도 포함되는데, 도메인을 빼고 url을 넣어야 함을 모르고 계속 집어넣어서 1시간가량 멘붕이 왔었다.
결국 API 가이드 처음부터 읽어보고 해결했다. 처음부터 가이드를 꼼꼼히 봅시다...
꼭 버전 확인, 가이드 확인!
최종적으로 인증번호 인증은 DB 활용해서 진행했다.